@marp-team/marp-cli
v4.2.3TypeScript
A CLI interface for Marp and Marpit based converters
17.9K/weekUpdated 6 months agoMITUnpacked: 2.0 MB
Published by Marp team
npm install @marp-team/marp-cli@marp-team/marp-cli


A CLI interface, for Marp (using @marp-team/marp-core) and any slide deck converter based on Marpit framework.
It can convert Marp / Marpit Markdown files into static HTML / CSS, PDF, PowerPoint document, and image(s) easily.

Try it now!
$3
npx (npm exec) is the best way to use the latest Marp CLI if you wanted
one-shot Markdown conversion _without install_. Just run below if you have
installed Node.js v18 and later.
``bashConvert slide deck into HTML
npx @marp-team/marp-cli@latest slide-deck.md
npx @marp-team/marp-cli@latest slide-deck.md -o output.html
Convert slide deck into PDF
npx @marp-team/marp-cli@latest slide-deck.md --pdf
npx @marp-team/marp-cli@latest slide-deck.md -o output.pdf
Convert slide deck into PowerPoint document (PPTX)
npx @marp-team/marp-cli@latest slide-deck.md --pptx
npx @marp-team/marp-cli@latest slide-deck.md -o output.pptx
Watch mode
npx @marp-team/marp-cli@latest -w slide-deck.md
Server mode (Pass directory to serve)
npx @marp-team/marp-cli@latest -s ./slides
`
> [!IMPORTANT]
> You have to install any one of [Google Chrome], [Microsoft Edge], or [Mozilla Firefox] to convert slide deck into PDF, PPTX, and image(s).
[google chrome]: https://www.google.com/chrome/
[microsoft edge]: https://www.microsoft.com/edge
[mozilla firefox]: https://www.mozilla.org/firefox/new/
$3
Don't you like installing Node.js and Chrome to local? We have an official container image that is ready to use CLI.
[⏩ Please refer how to use at Docker Hub.][marp-cli-docker]
[marp-cli-docker]: https://hub.docker.com/r/marpteam/marp-cli/
#### [Docker Hub][marp-cli-docker]
bash
docker pull marpteam/marp-cli
`bash
docker pull ghcr.io/marp-team/marp-cli
`Install
$3
You can use the package manager to install and update Marp CLI easily.
_Disclaimer: Package manifests are maintained by the community, not Marp team._
#### macOS: Homebrew
bash
brew install marp-cli
`#### Windows: Scoop
cmd
scoop install marp
`$3
We recommend to install Marp CLI into your Node.js project. You may control the CLI version (and engine if you want) exactly.
bash
npm install --save-dev @marp-team/marp-cli
`The installed
command is available in npm-scripts or npx marp.> [!NOTE]
> Marp CLI is working only with actively supported Node.js versions, so Node.js v18 and later is required when installing into your Node.js project.
#### Global installation
You can install with
-g option if you want to use marp command globally.`bash
npm install -g @marp-team/marp-cli
`$3
We also provide standalone binaries for Linux, macOS (Apple Silicon), and Windows. These have bundled Marp CLI with Node.js binary, so no need to install Node.js separately.
[⏩ Download the latest standalone binary from release page.][releases]
[releases]: https://github.com/marp-team/marp-cli/releases
Basic usage
> [!IMPORTANT]
> Several kind of conversions with 🌐 icon require to install any of compatible browsers, [Google Chrome], [Microsoft Edge], or [Mozilla Firefox]. When an unexpected problem has occurred while converting, please update your browser to the latest version. Check out browser options too.
$3
The passed markdown will be converted to HTML file by default. In the below example, a converted
will output to the same directory.`bash
marp slide-deck.md
`You can change the output path by
(-o) option.`bash
marp slide-deck.md -o output.html
`Marp CLI supports converting multiple files by passing multiple paths, directories, and glob patterns. In this case,
option cannot use.When you want to output the converted result to another directory with keeping the origin directory structure, you can use
--input-dir (-I) option. --output option would be available for specify the output directory.$3
If you passed
--pdf option or the output filename specified by --output (-o) option ends with .pdf, Marp CLI will try to convert Markdown into PDF file through the browser.`bash
marp --pdf slide-deck.md
marp slide-deck.md -o converted.pdf
`#### PDF output options
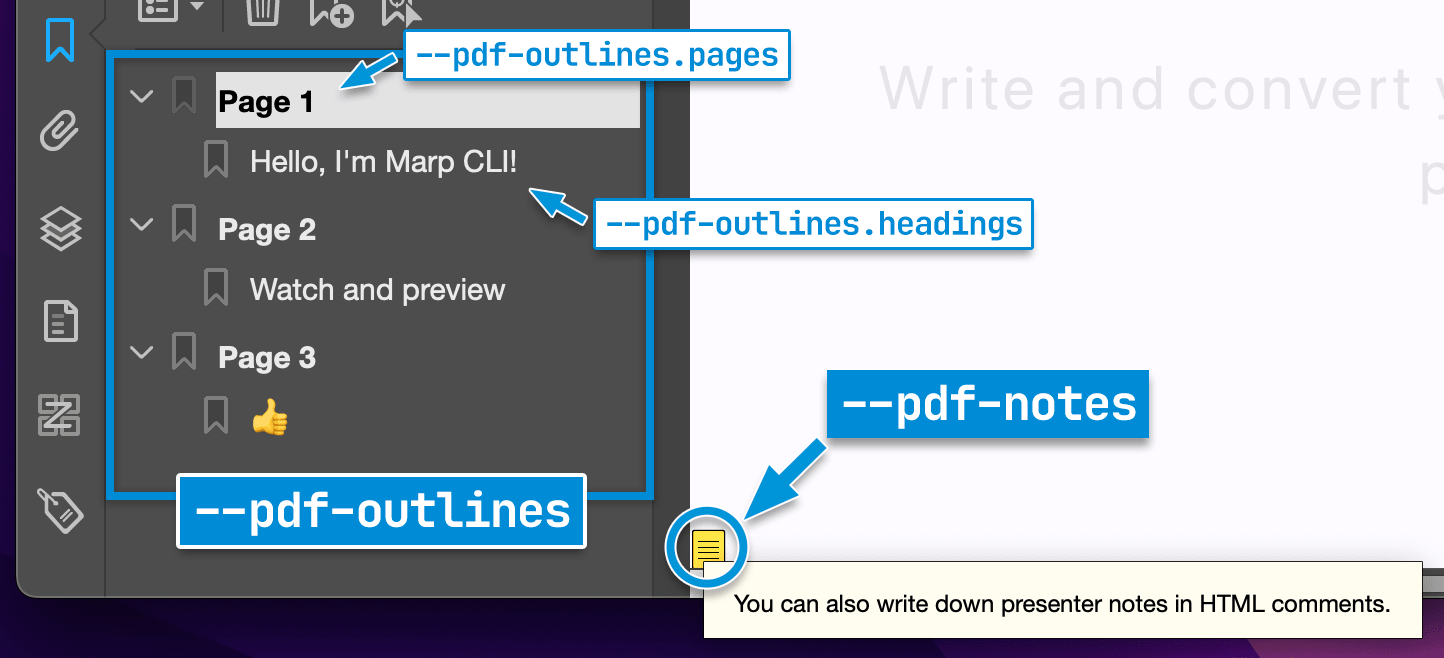
-
: Add PDF note annotations to the lower left when the slide page has [Marpit presenter notes].
- --pdf-outlines: Add PDF outlines/bookmarks.--pdf-outlines will make outlines based on slide pages and Markdown headings by default. If necessary, you may prevent making outlines from one of them, by setting --pdf-outlines.pages=false or --pdf-outlines.headings=false.
[marpit presenter notes]: https://marpit.marp.app/usage?id=presenter-notes
$3
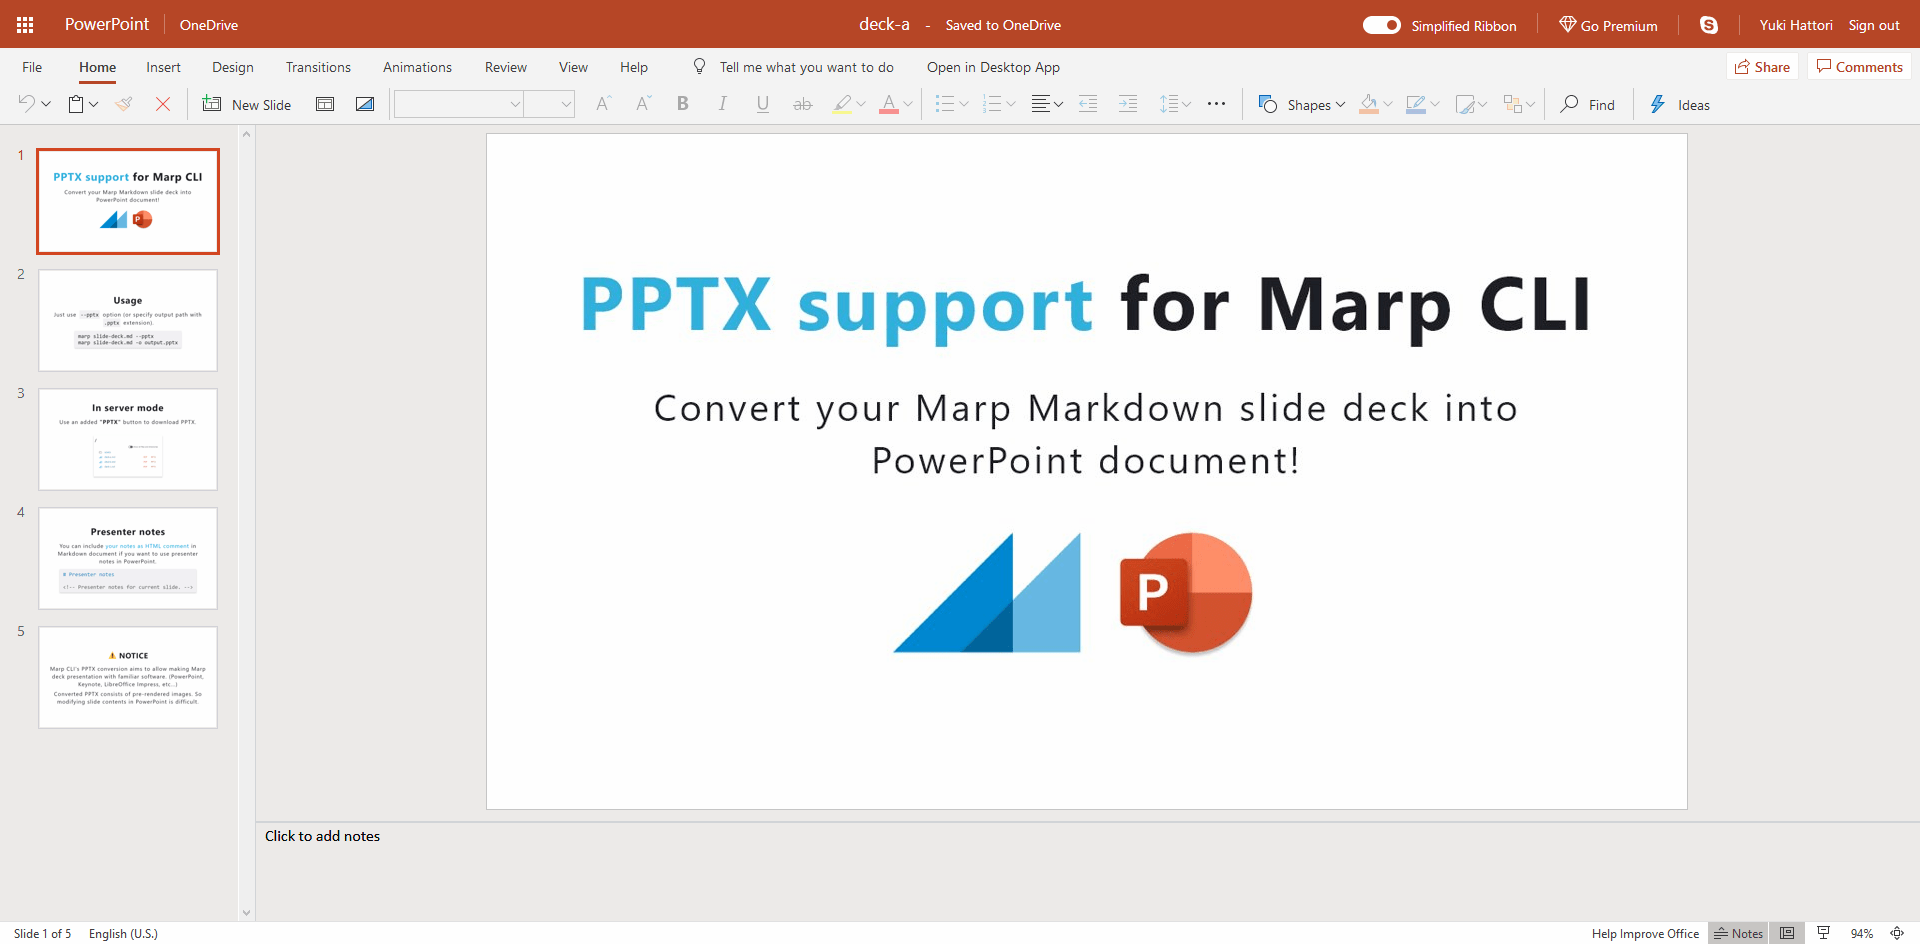
Do you want more familiar way to present and share your deck? PPTX conversion to create PowerPoint document is available by passing
--pptx option or specify the output path with PPTX extension.`bash
marp --pptx slide-deck.md
marp slide-deck.md -o converted.pptx
`A created PPTX includes rendered Marp slide pages and the support of [Marpit presenter notes]. It can open with PowerPoint, Keynote, Google Slides, LibreOffice Impress, and so on...
#### _[EXPERIMENTAL]_ Generate editable pptx (
)A converted PPTX usually consists of pre-rendered background images, that is meaning contents cannot to modify or re-use in PowerPoint. If you want to generate editable PPTX for modifying texts, shapes, and images in GUI, you can pass
--pptx-editable option together with --pptx option.`bash
marp --pptx --pptx-editable slide-deck.md
`> [!IMPORTANT]
>
> The experimental
 option requires installing both of the browser and LibreOffice Impress.
>
> If the theme and inline styles are providing complex styles into the slide,
--pptx-editable may throw an error or output the incomplete result. (e.g. gaia theme in Marp Core)> [!WARNING]
>
> Conversion to the editable PPTX results in lower slide reproducibility compared to the conversion into regular PPTX and other formats. Additionally, presenter notes are not supported. _We do not recommend to export the editable PPTX if maintaining the slide's appearance is important._
$3
#### Multiple images (
--images)You can convert the slide deck into multiple images when specified
--images [png|jpeg] option.`bash
Convert into multiple PNG image files
marp --images png slide-deck.mdConvert into multiple JPEG image files
marp --images jpeg slide-deck.md
`Output files have a suffix of page number, like
, slide-deck.002.png, and so on.#### Title slide (
--image)When you passed
--image option or specified the output path with PNG/JPEG extension, Marp CLI will convert _only the first page (title slide)_ of the targeted slide deck into an image.`bash
Convert the title slide into an image
marp --image png slide-deck.md
marp slide-deck.md -o output.png
`It would be useful for creating [Open Graph] image that can specify with
global directive and --og-image option.#### Scale factor
You can set the scale factor for rendered image(s) through
--image-scale option. It is useful for making high-resolution image from the slide.`bash
Generate high-resolution image of the title slide
marp slide-deck.md -o title-slide@2x.png --image-scale 2
`> [!TIP]
>
>
 is not affect to the actual size of presentation.
>
> The scale factor is also available for PPTX conversion. By default, Marp CLI will use
2 as the default scale factor in PPTX, to suppress deterioration of slide rendering in full-screen presentation.$3
You can export [presenter notes][marpit presenter notes] in Marp / Marpit Markdown as a text file by using
--notes option or specifying the output path with TXT extension.`bash
Export presenter notes as a text
marp --notes slide-deck.md
marp slide-deck.md -o output.txt
`$3
Because of the security reason, conversion that is using the browser cannot use local files by default.
Marp CLI would output incomplete result with warning if the blocked local file accessing is detected. We recommend uploading your assets to online.
If you really need to use local files in these conversion,
option helps to find your local files. _Please use only to the trusted Markdown because there is a potential security risk._`bash
marp --pdf --allow-local-files slide-deck.md
`Conversion modes
$3
When converting multiple files, Marp CLI will process them in parallel with 5 concurrency by default. You can set the number of concurrency by
(-P) option, or disable parallelism by --no-parallel.$3
Marp CLI will observe a change of Markdown and using theme CSS when passed with
--watch (-w) option. The conversion will be triggered whenever the content of file is updated.While you are opening the converted HTML in browser, it would refresh the opened page automatically.
$3
Server mode supports on-demand conversion by HTTP request. We require to pass
--server (-s) option and a directory to serve.

In this mode, the converted file outputs as the result of accessing to server, and not to disk.
You would get the converted PDF, PPTX, PNG, JPEG, and TXT by adding corresponded query string when requesting. e.g.
http://localhost:8080/deck-a.md?pdf returns converted PDF.> [!TIP]
>
> You can set the server port by setting the environment variable
PORT. For example, PORT=5000 marp -s ./slides would listen on port number 5000.####
index.md / PITCHME.mdMarp CLI server will provide the list of served files by default, but you can place the default Markdown deck like a common web server's
.Place Markdown named
index.md or PITCHME.md (GitPitch style) to served directory. It would be redirected just accessing to http://localhost:8080/.$3
When conversions were executed together with
--preview (-p) option, Marp CLI will open preview window(s) to check the converted result immediately.Unlike opening with browser, you may present deck with the immersive window.
Watch mode is automatically enabled while using preview window.
> [!NOTE]
>
>
--preview option cannot use when you are using Marp CLI through official Docker image.Browser options
$3
You can specify the kind of browser for conversion by
--browser option. Available browsers are chrome, edge, and firefox. If set comma-separated browsers, Marp CLI will try to use the first available browser among them.`bash
Use Firefox for image conversion
marp --browser firefox ./slide.md -o slide.pngPrefer to use Firefox first, then Chrome
marp --browser firefox,chrome ./slide.md -o slide.png
`The default is a special value
, which means to use the first available browser from chrome,edge,firefox.> [!WARNING]
>
> _Firefox support is still early stage._ The PDF output generated by Firefox may include some incompatible renderings compared to the PDF generated by Chrome.
$3
If you have a browser binary that cannot find out by Marp CLI automatically, you can explicitly set the path to the browser executable through
--browser-path option.`bash
Use Chromium-flavored browser (Chromium, Brave, Vivaldi, etc...)
marp --browser-path /path/to/chromium-flavored-browser ./slide.md -o slide.pdfUse Firefox with explicitly set path
marp --browser firefox --browser-path /path/to/firefox ./slide.md -o slide.png
`$3
-
: Set the preferred protocol for connecting to the browser.
- cdp: [Chrome DevTools Protocol][cdp] (default)
- webdriver-bidi: [WebDriver BiDi]
- --browser-timeout: Set the timeout for each browser operation in seconds. (default: 30 seconds)[cdp]: https://chromedevtools.github.io/devtools-protocol/
[webdriver bidi]: https://w3c.github.io/webdriver-bidi/
Template
You can choose a built-in HTML templates by
--template option. Default template is bespoke.`bash
marp --template bespoke slide-deck.md
`$3
The
template is using Bespoke.js as the name implies. It has several features to be useful in a real presentation. A few features may control by CLI options.#### Features
- Navigation: Navigate the deck through keyboard and swipe geasture.
- Fullscreen: Toggle fullscreen by hitting f / F11 key.
- On-screen controller: There is a touch-friendly OSC. You may also disable by
--bespoke.osc=false if unnecessary.
- Fragmented list: Recognize Marpit's fragmented list and appear list one-by-one if used * and 1) as the bullet marker.
- Presenter view: Open presenter view in external window by hitting p key. (It may become disabled when not fulfilled requirements for working)
- Progress bar (optional): By setting --bespoke.progress option, you can add a progress bar on the top of the deck.
- [Slide transitions][transitions]: Support transitions (transition local directive) powered by [View Transition API].[transitions]: ./docs/bespoke-transitions/README.md
[view transition api]: https://www.w3.org/TR/css-view-transitions-1/
#### Docs
- [Slide transitions in
bespoke template][transitions]
Learn all about of slide transitions for bespoke template: Built-in transitions, custom transitions, and morphing animations.

$3
The
bare template is a primitive template, and there is no extra features. It only has minimum assets to give your presentation with browser.#### Zero-JS slide deck
When the conversion engine is changed to Marpit framework by setting
engine option, _it would not use any scripts._ Even then, it has enough to use for the browser-based presentation.`bash
marp --template bare --engine @marp-team/marpit slide-deck.md
`Metadata
Through [global directives] or CLI options, you can set metadata for a converted HTML, PDF, and PPTX slide deck.
| [Global directives] | CLI option | Description | Available in |
| :-----------------: | :-------------: | :------------------------------ | :-------------- |
|
| --title | Define title of the slide deck | HTML, PDF, PPTX |
| description | --description | Define description of the slide | HTML, PDF, PPTX |
| author | --author | Define author of the slide deck | HTML, PDF, PPTX |
| keywords | --keywords | Define comma-separated keywords | HTML, PDF |
| url | --url | Define [canonical URL] | HTML |
| image | --og-image | Define [Open Graph] image URL | HTML |[canonical url]: https://en.wikipedia.org/wiki/Canonical_link_element
[open graph]: http://ogp.me/
When a title was not defined, Marp CLI may assign the title from the first heading of Markdown automatically. If not wanted this detection, specify the title as empty string
"".$3
Marp CLI supports _additional [global directives]_ to specify metadata in Markdown. You can define meta values in Markdown front-matter.
`markdown
---
title: Marp slide deck
description: An example slide deck created by Marp CLI
author: Yuki Hattori
keywords: marp,marp-cli,slide
url: https://marp.app/
image: https://marp.app/og-image.jpg
---Marp slide deck
`[global directives]: https://marpit.marp.app/directives?id=global-directives-1
$3
Marp CLI prefers CLI option to global directives. You can override metadata values by
, --description, --author, --keywords, --url, and --og-image.Theme
$3
You can override theme you want to use by
--theme option. For example to use Gaia built-in theme in Marp Core:`bash
marp --theme gaia
`$3
A custom theme created by user also can use easily by passing the path of CSS file.
bash
marp --theme custom-theme.css
`> [!TIP]
>
> Marpit theme CSS requires
meta comment in regular use, but it's not required in this usage.$3
--theme-set option has to specify theme set composed by multiple theme CSS files. The registered themes are usable in Marpit's theme directive.`bash
Multiple theme CSS files
marp --theme-set theme-a.css theme-b.css theme-c.css -- deck-a.md deck-b.mdTheme directory
marp --theme-set ./themes -- deck.md
`Engine
Marp CLI is calling the Marpit framework based converter as "Engine". Normally we use the bundled Marp Core, but you may swap the conversion engine to another Marpit based engine through
option.You can use Marp (and compatible markdown-it) plugins while converting, or completely swap the converter to the other Marpit-based engine which published to npm.
$3
For example, you can convert Markdown with using the pure Marpit framework.
`bash
Install Marpit framework
npm i @marp-team/marpitSpecify engine to use Marpit
marp --engine @marp-team/marpit marpit-deck.md
`Notice that Marpit has not provided theme. It would be good to include inline style in Markdown, or pass CSS file by
option.> [!TIP]
>
> If you want to use the Marpit-based custom engine by the module name, the specified module must be exporting a class inherited from Marpit as the default export.
$3
When you specified the path to JavaScript file (
.js, .cjs, or .mjs) in --engine option, you may use more customized engine by a JavaScript function.#### Spec
The functional engine should export a function as the default export, which should have a single argument representing the constructor option of Marpit/Marp Core.
The function must return a class inherited from Marpit, or an instance of Marpit-based engine made by the parameter passed by argument.
`javascript
// engine.mjs (ES modules)
import { MarpitBasedEngine } from 'marpit-based-engine'export default () => MarpitBasedEngine // Return a class inherited from Marpit
`javascript
// engine.cjs (CommonJS)
const { MarpitBasedEngine } = require('marpit-based-engine')module.exports = function (constructorOptions) {
// Return an instance of Marpit initialized by passed constructor options
return new MarpitBasedEngine(constructorOptions)
}
` object so you can use async function too.`javascript
export default async (constructorOptions) => {
const { MarpitBasedEngine } = await import('marpit-based-engine')
return new MarpitBasedEngine(constructorOptions)
}
`> [!WARNING]
>
> Currently ES Modules can resolve only when using Marp CLI via Node.js. The standalone binary cannot resolve ESM. (vercel/pkg#1291)
####
getter propertyMarp CLI also exposes
marp getter property to the parameter. It returns a prepared instance of the built-in Marp Core engine, so you can apply several customizations to Marp engine with simple declarations.`javascript
const marpPlugin = require('marp-plugin-foo')
const andMorePlugin = require('marp-plugin-bar')module.exports = ({ marp }) => marp.use(marpPlugin).use(andMorePlugin)
`It allows converting Markdown with additional syntaxes that were provided by Marp (or compatible markdown-it) plugins.
#### Example: markdown-it-mark
javascript
// engine.mjs
import markdownItMark from 'markdown-it-mark'export default ({ marp }) => marp.use(markdownItMark)
`bash
Install markdown-it-mark into your project
npm i markdown-it-mark --saveSpecify the path to functional engine
marp --engine ./engine.mjs slide-deck.md
`The customized engine will convert
to marked.$3
By using
--version (-v) option, you may confirm the version of engine that is expected to use in current configuration.`console
$ marp --version
@marp-team/marp-cli v4.x.x (w/ @marp-team/marp-core v4.x.x)
`$3
Marp CLI prefers to use _an installed core to local project by user_ than the bundled.
If the current project has installed
individually, it would show its version and the annotation: w/ user-installed @marp-team/marp-core vX.X.X or w/ customized engine.`console
$ npm i @marp-team/marp-cli @marp-team/marp-core@^4.0.0 --save-dev
$ npx marp --version
@marp-team/marp-cli v4.x.x (w/ user-installed @marp-team/marp-core v4.0.0)
`Configuration file
Marp CLI can be configured options with file, such as
, marp.config.mjs (ES Modules), marp.config.cjs (CommonJS), .marprc (JSON / YAML), and marp section of package.json.It is useful to configure settings for the whole of project.
`javascript
// package.json
{
"marp": {
"inputDir": "./slides",
"output": "./public",
"themeSet": "./themes"
}
}
`yaml
.marprc.yml
allowLocalFiles: true
options:
looseYAML: false
markdown:
breaks: false
pdf: true
`javascript
// marp.config.mjs
import markdownItContainer from 'markdown-it-container'export default {
// Customize engine on configuration file directly
engine: ({ marp }) => marp.use(markdownItContainer, 'custom'),
}
`By default we use configuration file that is placed on current directory, but you may also specify the path for a configuration file by
(--config / -c) option.If you want to prevent looking up a configuration file, you can pass
--no-config-file (--no-config) option.> [!WARNING]
>
> Currently ES Modules can resolve only when using Marp CLI via Node.js. The standalone binary cannot resolve ESM. (vercel/pkg#1291)
$3
| Key | Type | CLI option | Description |
| :---------------- | :-------------------------: | :-----------------------: | :---------------------------------------------------------------------------------------------------------- |
|
allowLocalFiles | boolean | --allow-local-files | Allow to access local files from Markdown while converting PDF _(NOT SECURE)_ |
| author | string | --author | Define author of the slide deck |
| bespoke | object | | Setting options for bespoke template |
| ┗ osc | boolean | --bespoke.osc | \[Bespoke\] Use on-screen controller (true by default) |
| ┗ progress | boolean | --bespoke.progress | \[Bespoke\] Use progress bar (false by default) |
| ┗ transition | boolean | --bespoke.transition | \[Bespoke\] Use [transitions] (Only in browsers supported [View Transition API]: true by default) |
| browser | string \| string[] | --browser | The kind of browser for conversion (auto by default) |
| browserPath | string | --browser-path | Path to the browser executable |
| browserProtocol | cdp \| webdriver-bidi | --browser-protocol | Set the preferred protocol for connecting to the browser (cdp by default) |
| browserTimeout | number | --browser-timeout | Set the timeout for each browser operation in seconds (30 by default) |
| description | string | --description | Define description of the slide deck |
| engine | string \| Class \| Function | --engine | Specify Marpit based engine |
| html | boolean \| object | --html | Enable or disable HTML tags (Configuration file can pass [the whitelist object] if you are using Marp Core) |
| image | png \| jpeg | --image | Convert the first slide page into an image file |
| images | png \| jpeg | --images | Convert slide deck into multiple image files |
| imageScale | number | --image-scale | The scale factor for rendered images (1 by default, or 2 for PPTX conversion) |
| inputDir | string | --input-dir -I | The base directory to find markdown and theme CSS |
| jpegQuality | number | --jpeg-quality | Setting JPEG image quality (85 by default) |
| keywords | string \| string[] | --keywords | Define keywords for the slide deck (Accepts comma-separated string and array of string) |
| lang | string | | Define the language of converted HTML |
| notes | boolean | --notes | Convert slide deck notes into a text file |
| ogImage | string | --og-image | Define [Open Graph] image URL |
| options | object | | The base options for the constructor of engine |
| output | string | --output -o | Output file path (or directory when input-dir is passed) |
| parallel | boolean \| number | --parallel -P | Set the number of concurrency for parallel conversion (5 by default) |
| pdf | boolean | --pdf | Convert slide deck into PDF |
| pdfNotes | boolean | --pdf-notes | Add [presenter notes][marpit presenter notes] to PDF as annotations |
| pdfOutlines | boolean \| object | --pdf-outlines | Add outlines (bookmarks) to PDF |
| ┗ pages | boolean | --pdf-outlines.pages | Make PDF outlines from slide pages (true by default when pdfOutlines is enabled) |
| ┗ headings | boolean | --pdf-outlines.headings | Make PDF outlines from Markdown headings (true by default when pdfOutlines is enabled) |
| pptx | boolean | --pptx | Convert slide deck into PowerPoint document |
| pptxEditable | boolean | --pptx-editable | _[EXPERIMENTAL]_ Generate editable PPTX when converting to PPTX |
| preview | boolean | --preview -p | Open preview window |
| server | boolean | --server -s | Enable server mode |
| template | bare \| bespoke | --template | Choose template (bespoke by default) |
| theme | string | --theme | Override theme by name or CSS file |
| themeSet | string \| string[] | --theme-set | Path to additional theme CSS files |
| title | string | --title | Define title of the slide deck |
| url | string | --url | Define [canonical URL] |
| watch | boolean | --watch -w | Watch input markdowns for changes |[the whitelist object]: https://github.com/marp-team/marp-core#html-boolean--object
Some of options that cannot specify through CLI options can be configured by file. (e.g.
options field for the constructor option of used engine)
Example: Customize engine's constructor option
You can fine-tune constructor options for the engine, Marp Core / Marpit.
`json
{
"options": {
"markdown": {
"breaks": false
},
"minifyCSS": false
}
}
`This configuration will set the constructor option for Marp Core as specified:
- Disables Marp Core's line breaks conversion (
to ) to match for CommonMark, by passing markdown-it's breaks option as false.
- Disable minification for rendered theme CSS to make debug your style easily, by passing minifyCSS as false.> [!WARNING]
>
> Some options may be overridden by used template.
$3
When Marp CLI has been installed into the local project, for getting the power of auto completion for the config, such as IntelliSense, you can annotate the config object through JSDoc, with Marp CLI's
Config type.`javascript
/* @type {import('@marp-team/marp-cli').Config} /
const config = {
// ...
}export default config
`Or you can import Vite-like
helper from Marp CLI instead.`javascript
import { defineConfig } from '@marp-team/marp-cli'export default defineConfig({
// ...
})
`####
type with custom engineIf you've swapped the engine into another Marpit based engine, you can provide better suggestion for
options field by passing the engine type to generics.`javascript
/* @type {import('@marp-team/marp-cli').Config} /
const config = {
engine: '@marp-team/marpit',
options: {
// Suggest only Marpit constructor options, not Marp Core
},
}export default config
`#### TypeScript (
)If you installed
typescript into your local project together with Marp CLI, you can write a config by TypeScript marp.config.ts. Marp CLI will try to transpile .ts with the project configuration tsconfig.json.In TypeScript configuration, you can specify the custom engine as the generics for
defineConfig helper, like this:`typescript
// marp.config.ts
import { Marpit } from '@marp-team/marpit'
import { defineConfig } from '@marp-team/marp-cli'export default defineConfig({
engine: Marpit,
options: {
// Suggest only Marpit constructor options
},
})
`API _(EXPERIMENTAL)_
You can use Marp CLI through Node.js if installed Marp CLI into your local project.
js
const { marpCli } = require('@marp-team/marp-cli')marpCli(['test.md', '--pdf'])
  .then((exitStatus) => {
    if (exitStatus > 0) {
      console.error(
Failure (Exit status: ${exitStatus}))
} else {
console.log('Success')
}
})
.catch(console.error)
` accepts an argument of CLI options as array, and returns Promise to resolve an expected exit status in CLI. It would be rejected with the instance of Error if CLI met an error to suspend the conversion process.$3
CLIError class and CLIErrorCode enum from @marp-team/marp-cli, to allow handling for specific errors that have already known by Marp CLI.If
CLIError instance was thrown, you can identify the reason why CLI threw error by checking errorCode member.$3
marpCli() would not be resolved initiatively if started some observation: Watch mode, server mode, and preview window.waitForObservation() is helpful to handle them. It returns Promise that would be resolved with helper object when ready to observe resources in marpCli().`javascript
const { marpCli, waitForObservation } = require('@marp-team/marp-cli')marpCli(['--server', './slides/'])
.then((exitCode) => console.log(
Done with exit code ${exitCode}))
.catch(console.error)waitForObservation().then(({ stop }) => {
console.log('Observed')
// Stop observations to resolve marpCli()'s Promise
stop()
})
`The resolved helper has
method for telling Marp CLI to stop observation and resolve Promise`.Contributing
Are you interested in contributing? Please see CONTRIBUTING.md and the common contributing guideline for Marp team.
Author
Managed by @marp-team.
- ![]() Yuki Hattori (@yhatt)
Yuki Hattori (@yhatt)
License
This tool releases under the MIT License.