cac
v6.7.14TypeScript
Simple yet powerful framework for building command-line apps.
0/weekUpdated 4 months agoMITUnpacked: 81.8 KB
Published by egoist
npm install cac
      
Introduction
Command And Conquer is a JavaScript library for building CLI apps.
Features
- Super light-weight: No dependency, just a single file.
- Easy to learn. There're only 4 APIs you need to learn for building simple CLIs: cli.option cli.version cli.help cli.parse.
- Yet so powerful. Enable features like default command, git-like subcommands, validation for required arguments and options, variadic arguments, dot-nested options, automated help message generation and so on.
- Developer friendly. Written in TypeScript.
Table of Contents
- Install
- Usage
- Simple Parsing
- Display Help Message and Version
- Command-specific Options
- Dash in option names
- Brackets
- Negated Options
- Variadic Arguments
- Dot-nested Options
- Default Command
- Supply an array as option value
- Error Handling
- With TypeScript
- With Deno
- Projects Using CAC
- References
- CLI Instance
- cac(name?)
- cli.command(name, description, config?)
- cli.option(name, description, config?)
- cli.parse(argv?)
- cli.version(version, customFlags?)
- cli.help(callback?)
- cli.outputHelp()
- cli.usage(text)
- Command Instance
- command.option()
- command.action(callback)
- command.alias(name)
- command.allowUnknownOptions()
- command.example(example)
- command.usage(text)
- Events
- FAQ
- How is the name written and pronounced?
- Why not use Commander.js?
- Project Stats
- Contributing
- Author
Install
``bash`
yarn add cac
Usage
$3
Use CAC as simple argument parser:
`js
// examples/basic-usage.js
const cli = require('cac')()
cli.option('--type
default: 'node',
})
const parsed = cli.parse()
console.log(JSON.stringify(parsed, null, 2))
`

$3
`js
// examples/help.js
const cli = require('cac')()
cli.option('--type [type]', 'Choose a project type', {
default: 'node',
})
cli.option('--name
cli.command('lint [...files]', 'Lint files').action((files, options) => {
console.log(files, options)
})
// Display help message when -h or --help appears-v
cli.help()
// Display version number when or --version appears
// It's also used in help message
cli.version('0.0.0')
cli.parse()
`

$3
You can attach options to a command.
`js
const cli = require('cac')()
cli
.command('rm
.option('-r, --recursive', 'Remove recursively')
.action((dir, options) => {
console.log('remove ' + dir + (options.recursive ? ' recursively' : ''))
})
cli.help()
cli.parse()
`
A command's options are validated when the command is used. Any unknown options will be reported as an error. However, if an action-based command does not define an action, then the options are not validated. If you really want to use unknown options, use command.allowUnknownOptions.

$3
Options in kebab-case should be referenced in camelCase in your code:
`js`
cli
.command('dev', 'Start dev server')
.option('--clear-screen', 'Clear screen')
.action((options) => {
console.log(options.clearScreen)
})
In fact --clear-screen and --clearScreen are both mapped to options.clearScreen.
$3
When using brackets in command name, angled brackets indicate required command arguments, while square bracket indicate optional arguments.
When using brackets in option name, angled brackets indicate that a string / number value is required, while square bracket indicate that the value can also be true.
`js
const cli = require('cac')()
cli
.command('deploy
.option('--scale [level]', 'Scaling level')
.action((folder, options) => {
// ...
})
cli
.command('build [project]', 'Build a project')
.option('--out
.action((folder, options) => {
// ...
})
cli.parse()
`
$3
To allow an option whose value is false, you need to manually specify a negated option:
`js`
cli
.command('build [project]', 'Build a project')
.option('--no-config', 'Disable config file')
.option('--config
This will let CAC set the default value of config to true, and you can use --no-config flag to set it to false.
$3
The last argument of a command can be variadic, and only the last argument. To make an argument variadic you have to add ... to the start of argument name, just like the rest operator in JavaScript. Here is an example:
`js
const cli = require('cac')()
cli
.command('build
.option('--foo', 'Foo option')
.action((entry, otherFiles, options) => {
console.log(entry)
console.log(otherFiles)
console.log(options)
})
cli.help()
cli.parse()
`

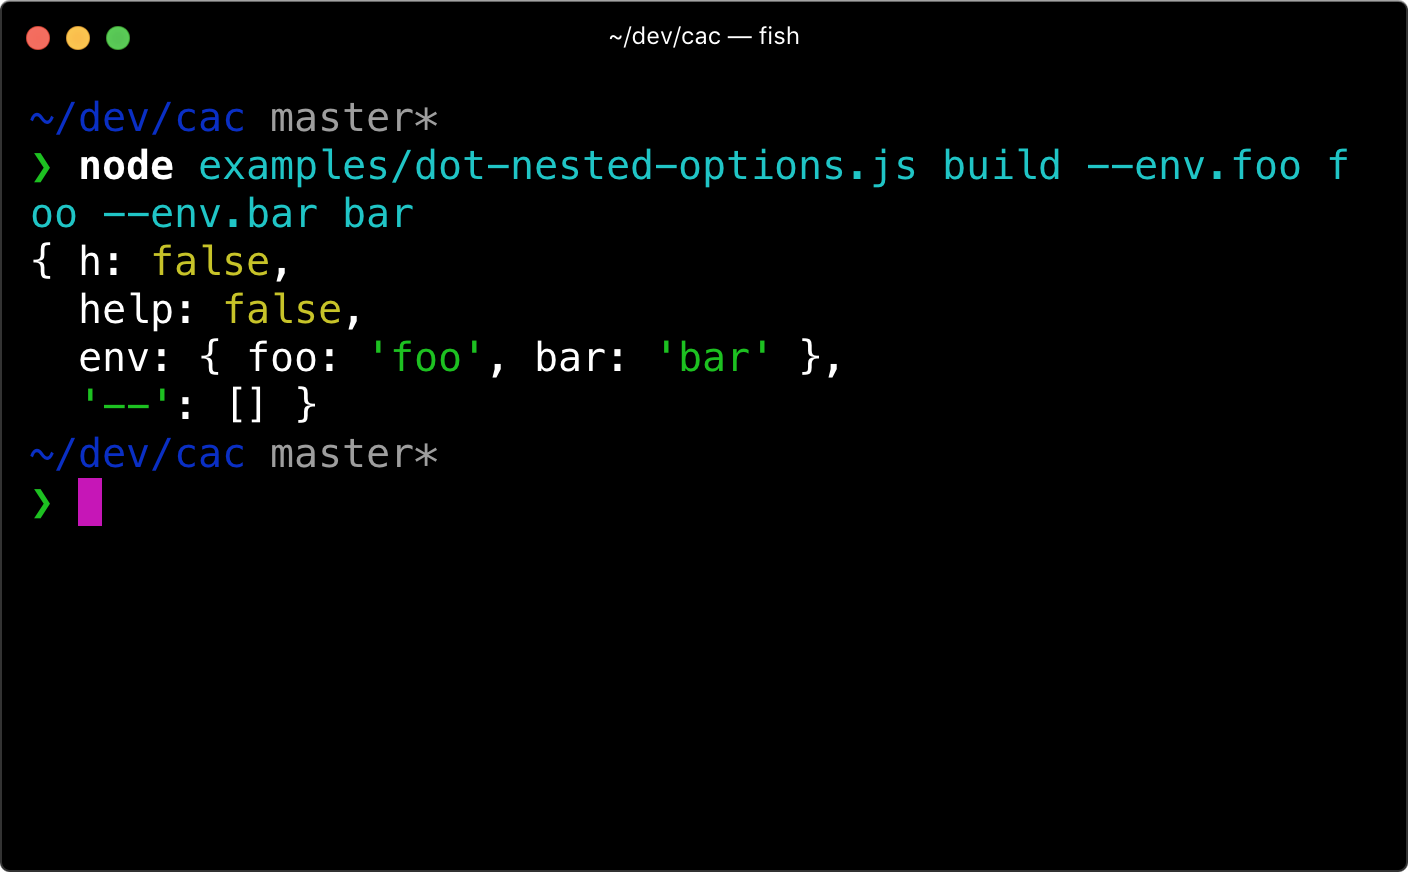
$3
Dot-nested options will be merged into a single option.
`js
const cli = require('cac')()
cli
.command('build', 'desc')
.option('--env
.example('--env.API_SECRET xxx')
.action((options) => {
console.log(options)
})
cli.help()
cli.parse()
`
$3
Register a command that will be used when no other command is matched.
`js
const cli = require('cac')()
cli
// Simply omit the command name, just brackets
.command('[...files]', 'Build files')
.option('--minimize', 'Minimize output')
.action((files, options) => {
console.log(files)
console.log(options.minimize)
})
cli.parse()
`
$3
`bash
node cli.js --include project-aThe parsed options will be:
{ include: 'project-a' }
node cli.js --include project-a --include project-b
The parsed options will be:
{ include: ['project-a', 'project-b'] }
`
$3
To handle command errors globally:
js
try {
  // Parse CLI args without running the command
  cli.parse(process.argv, { run: false })
  // Run the command yourself
  // You only need
await when your command action returns a Promise
await cli.runMatchedCommand()
} catch (error) {
// Handle error here..
// e.g.
// console.error(error.stack)
// process.exit(1)
}
`$3
First you need
to be installed as a dev dependency in your project:`bash
yarn add @types/node --dev
`Then everything just works out of the box:
js
const { cac } = require('cac')
// OR ES modules
import { cac } from 'cac'
`$3
ts
import { cac } from 'https://unpkg.com/cac/mod.ts'const cli = cac('my-program')
`Projects Using CAC
Projects that use CAC:
- VuePress: :memo: Minimalistic Vue-powered static site generator.
- SAO: ⚔️ Futuristic scaffolding tool.
- DocPad: 🏹 Powerful Static Site Generator.
- Poi: ⚡️ Delightful web development.
- bili: 🥂 Schweizer Armeemesser for bundling JavaScript libraries.
- Lad: 👦 Lad scaffolds a Koa webapp and API framework for Node.js.
- Lass: 💁🏻 Scaffold a modern package boilerplate for Node.js.
- Foy: 🏗 A lightweight and modern task runner and build tool for general purpose.
- Vuese: 🤗 One-stop solution for vue component documentation.
- NUT: 🌰 A framework born for microfrontends
- Feel free to add yours here...
References
💁 Check out the generated docs from source code if you want a more in-depth API references.
Below is a brief overview.
$3
CLI instance is created by invoking the
function:`js
const cac = require('cac')
const cli = cac()
`#### cac(name?)
Create a CLI instance, optionally specify the program name which will be used to display in help and version message. When not set we use the basename of
.#### cli.command(name, description, config?)
- Type:
(name: string, description: string) => CommandCreate a command instance.
The option also accepts a third argument
for additional command config:-
config.allowUnknownOptions: boolean Allow unknown options in this command.
- config.ignoreOptionDefaultValue: boolean Don't use the options's default value in parsed options, only display them in help message.#### cli.option(name, description, config?)
- Type:
(name: string, description: string, config?: OptionConfig) => CLIAdd a global option.
The option also accepts a third argument
for additional option config:-
config.default: Default value for the option.
- config.type: any[] When set to [], the option value returns an array type. You can also use a conversion function such as [String], which will invoke the option value with String.#### cli.parse(argv?)
- Type:
(argv = process.argv) => ParsedArgvts
interface ParsedArgv {
args: string[]
options: {
[k: string]: any
}
}
`When this method is called,
cli.args cli.options cli.matchedCommand will also be available.#### cli.version(version, customFlags?)
- Type:
(version: string, customFlags = '-v, --version') => CLIOutput version number when
flag appears.#### cli.help(callback?)
- Type:
(callback?: HelpCallback) => CLIOutput help message when
flag appears.Optional
callback allows post-processing of help text before it is displayed:`ts
type HelpCallback = (sections: HelpSection[]) => voidinterface HelpSection {
title?: string
body: string
}
`#### cli.outputHelp()
- Type:
Output help message.
#### cli.usage(text)
- Type:
Add a global usage text. This is not used by sub-commands.
$3
Command instance is created by invoking the
method:`js
const command = cli.command('build [...files]', 'Build given files')
`#### command.option()
Basically the same as
but this adds the option to specific command.#### command.action(callback)
- Type:
(callback: ActionCallback) => CommandUse a callback function as the command action when the command matches user inputs.
ts
type ActionCallback = (
  // Parsed CLI args
  // The last arg will be an array if it's a variadic argument
  ...args: string | string[] | number | number[]
  // Parsed CLI options
  options: Options
) => anyinterface Options {
  [k: string]: any
}
`#### command.alias(name)
- Type:
Add an alias name to this command, the
here can't contain brackets.#### command.allowUnknownOptions()
- Type:
() => CommandAllow unknown options in this command, by default CAC will log an error when unknown options are used.
#### command.example(example)
- Type:
Add an example which will be displayed at the end of help message.
ts
type CommandExample = ((name: string) => string) | string
`#### command.usage(text)
- Type:
Add a usage text for this command.
$3
Listen to commands:
js
// Listen to the
foo command
cli.on('command:foo', () => {
// Do something
})// Listen to the default command
cli.on('command:!', () => {
// Do something
})
// Listen to unknown commands
cli.on('command:*', () => {
console.error('Invalid command: %s', cli.args.join(' '))
process.exit(1)
})
`FAQ
$3
CAC, or cac, pronounced
.This project is dedicated to our lovely C.C. sama. Maybe CAC stands for C&C as well :P

$3
CAC is very similar to Commander.js, while the latter does not support dot nested options, i.e. something like
--env.API_SECRET foo. Besides, you can't use unknown options in Commander.js either._And maybe more..._
Basically I made CAC to fulfill my own needs for building CLI apps like Poi, SAO and all my CLI apps. It's small, simple but powerful :P
Project Stats
!Alt
Contributing
1. Fork it!
2. Create your feature branch:
git checkout -b my-new-feature
3. Commit your changes:
4. Push to the branch: 5. Submit a pull request :D
Author
CAC © EGOIST, Released under the MIT License.
Authored and maintained by egoist with help from contributors (list).
> Website · GitHub @egoist · Twitter @\_egoistlily