easy-bdd-tool-jest
v1.0.4TypeScript
Easy BDD Tool, for Jest. Create your BDD tests directly in code, and get readable error messages. Exports to Gherkin/Cucumber feature files.
0/weekUpdated 1 years agoMITUnpacked: 358.6 KB
Published by Marcelo Glasberg
npm install easy-bdd-tool-jestEasy BDD Tool, For Jest
Click here to read the article on Medium.
This package aims to be the simplest way to write
Behavior Driven Development (BDD) tests in Jest for your TypeScript and JavaScript projects.
Most other npm packages are not BDD specific, or they're just too hard to use (like Cucumber, in my opinion).
This package doesn't need "glue files" or any generated code. This is a code example:
When you run your BDDs in the IDE, your tests will be listed in the left panel, numbered as
1, 2 etc.
For BDDs that run more than once with different values, each run is going to be numbered with an index, like:
1₁
and
1₂.
The output of each BDD will be printed with color to the console.
For tests that fail you'll get the error stacktrace, and the failing description.
A screenshot for the IntelliJ IDE:
> _Note there is also a version of this package for Flutter/Dart._
---
What is it?
BDD is a fantastic development technique that empowers you to build comprehensive, well-documented,
well-tested, and easily adjustable code. It enhances the collaboration between developers and
"business stakeholders", which include Project and Product managers, Product owners, Business analysts, QA
engineers, testers, and sometimes even clients.
Despite its numerous benefits, not all companies adopt BDD. One reason behind this is that
traditional BDD tools tend to complicate the process, discouraging developers from writing
BDDs. And let's be honest, if it's challenging to write BDDs, they simply won't get written.
In the past, I championed writing BDDs manually, bypassing the need for a BDD tool. This approach
has its limitations though, particularly for larger teams. It becomes difficult to establish a
standard for writing BDDs, and potentially leaves other staff members in the dark. A suitable
tool can solve this, as long as it eliminates unnecessary complexity and puts the developers'
needs at the forefront.
That's where this package comes in. It's designed to make writing BDDs an absolute breeze,
encouraging developers to adopt it. And in spite of its "developer-centric" approach, I believe
that business stakeholders will also appreciate and prefer the streamlined process it introduces.
Here's what makes this Easy BDD Tool stand out:
- You can create BDD tests entirely in code, no need for
.feature files.
- It is _developer-centric_, catering primarily to the needs of developers, rather than business
stakeholders.
- But to keep the business stakeholders in the loop, you have the option to export to
Gherkin/Cucumber
.feature files, automatically, each time the tests are run.
- There's no need for "glue files" or glue code to extract information from
.feature files.
- It doesn't use _generated code_. You can skip including the
build_runner package.
- To aid code development, and also to
support TDD in case you need
it, it provides clear, colorful and easily understandable error messages in the console when
assertions fail.
- It's user-friendly for both individual developers and teams.
- It encourages writing more BDDs, by greatly simplifying the process.
- It uses the Gherkin Syntax. Note: Other syntaxes are possible, with
some adaptation.
The following is a thorough documentation and a comprehensive BDD tutorial, complete with a real example. Whether you
need to learn BDD, or you are experienced and looking to refine your technique, I've got you covered.
Get ready to master creating BDDs in practice!
---
1. Understanding how other BDD tools operate
Before we dive deeper, let's take a moment to understand how typical BDD tools function, and
why they might not be my cup of tea.
Typically, the process follows these steps:
1. Some business stakeholders pen down BDD specs in structured text files called "feature files". These files detail
specific features that your software must provide.
2. Developers then create "glue files" to pair with these feature files. They essentially _glue_
the human-readable specifications to the executable code, by reading the specification text and
converting it to typed values in real code variables.
3. Next, developers code and execute the BDDs, where both the input values and expected outcomes
were created by the glue code from the feature files.
4. If any issues or missing details surface in the feature files, developers must alert the business
stakeholders, wait for necessary amendments, then revisit the glue files and implement fixes in
the code.
5. Similarly, when developers identify absent BDDs, they must request the business stakeholders to
generate more feature files.
Let's illustrate this with an example. Say, a business analyst drafted the following feature file:
``
Scenario: Selling stocks

   Given user Alice has 10 shares of IBM.

   When Alice sells 8 shares to Bill for $2 each.

   Then Alice gets $16.
`
Your role as a developer would be first to construct a _glue file_, extracting all the data

points: Alice, $10, IBM, Bill, $2, and $20. Remember, as a feature file is textual,
these values are text strings.
However, for the test code, you'd require Alice and Bill as User objects, IBM as
a Stock object, and the monetary figures as Money objects. So, you'll need to code a mechanism
to transform these string data into typed objects.
The catch is, any modification in these values by the business analyst might break the test. For
instance, if Alice sells 12 shares instead of 8, that's a problem because she only owns 10. Such a
change would necessitate code adjustments to ensure the test passes.
Ideally, the coded solution should cover all possible scenarios. To maximize the benefits of BDD,
the business analyst should craft the feature file to encompass all relevant data variations.
Here's an updated version:
`
Scenario: Selling stocks

   Given user Alice has  shares of .

   When Alice sells  shares to Bill for  each.

   Then Alice gets .

   Example:

      number | stock | number sold | price | balance

      10     | IBM   | 8           | 2     | 16

      10     | IBM   | 12          | 2     | error

      10     | IBM   | 8           | 0     | error
`
This feature file is more complex. Coming up with it may have required significant back-and-forth

between the developer and the business analysts.

The business analysts were forced into this complexity, even if they might

have preferred separate BDDs for error scenarios, rather than lumping them into a single BDD.


A potential alternative could be for the developer to skip the glue file, and hard-code the values

as actual objects straight into the test code, instead of reading them from the feature file. This

approach, however, carries the risk of the feature file becoming disjointed from the code. If the

business analyst amends the feature file, the developer might overlook updating the code. Besides,

if the feature file naturally includes an example table like the one above, not reading directly

from the table values would necessitate creating a large amount of hard-code data in the BDD.


Another hiccup is that, while coding, the developer often thinks of numerous additional BDDs to

implement. But rather than just putting them into effect, they have to run through the entire

process of asking the business analysts to add them, then recreating the associated glue files,

and so on.


Finally, it can be challenging for the business analysts to consider all the minutiae of a BDD when

composing it. They frequently end up crafting incomplete BDDs, which then have to be remedied

by the developer. The devil truly is in the details, and it's considerably easier for the

developer, not business analysts, to uncover the necessary specifics when writing the code.

Here's an example:
`gherkin
Scenario: Buying stocks
Given user Alice has 10 shares of IBM.
When Alice buys 8 shares from Bill for $2 each.
Then Alice spends $16 and ends up with 18 shares.
`
The BDD above is incomplete. It should be written in the "given" section that Alice has sufficient

funds to buy the shares. If she doesn't, the purchase should be unsuccessful. Here's the corrected

BDD:
`gherkin
Scenario: Buying stocks
Given user Alice has 10 shares of IBM and $20 in balance. # here!
When Alice buys 8 shares from Bill for $2 each.
Then Alice ends up with 18 shares and $4.
`
However, the developer is in a better position to spot the mistake, as the code will fail as soon

as the developer runs it, when Alice lacks enough money. When the developer has the control,

the BDD assists in guiding its own creation.


This entire procedure can be quite laborious for both developers and business stakeholders, often

resulting in a lesser number of BDDs being composed. It's essential to keep the process as

streamlined as possible to maximize efficiency and ensure all potential scenarios are adequately

covered.


---


2. How this Easy BDD Tool package is different


The present package fundamentally rethinks the way you interact with BDDs. It's designed

with simplicity and efficiency in mind. Here's how it works:


- Business stakeholders begin by jotting down BDD drafts. These don't have to be perfectly

  structured feature files just yet.

- Developers read these drafts and bring the BDDs to life directly through code, including the

  wording of the BDDs.

- Developers directly instantiate the BDD values as properly typed objects. No more fumbling

  with strings!

- If developers spot any errors or missing details in the feature files, they've got the green light

  to fix them right on the spot, directly within the code.

- When developers notice more BDDs are needed, they can instantly add them to the code. If some

  BDDs are too difficult to code, they can be broken into smaller BDDs right away.

- After coding, developers can run the BDD tests and effortlessly observe both the BDD text and the

  results neatly well formatted in the console.

- The cherry on top is that simply running the BDD tests also auto-generates the feature files,

  and saves them into some suitable directory close to the code.

  These feature files will get committed to the version control repository, when the code itself

  gets committed. Here, the business stakeholders can go through them to ensure everything's on

  track. This also provides a historic trail of feature file alterations in the repo, and even

  allows for version comparisons.

- Optionally, tools like Jira are smart enough to pull the feature files directly from your Git

  repo, and present them in an easy-to-digest

  format (see here).

  This makes the business stakeholders' review process a breeze.


This new process greatly reduces the tedious back-and-forth between business stakeholders and

developers for fixing feature files. Say goodbye to glue code or the hassle of converting strings

into appropriately typed objects.


The Easy BDD Tool also takes the pressure off business stakeholders, as they don't have to craft

perfect BDDs right from the get-go. They can rely on developers to enrich the details when they're

translating the BDDs into code – that's when the finer points truly come to light. All the while,

business stakeholders stay in the loop by reviewing the feature files stored in the repo.


From my experience, this revised process makes it writing BDDs as easy as writing unit tests!


---


3. BDD Recap


Let's do a quick BDD recap, and then create some BDDs for a real app that's included in the
example directory of this package.
Behavior-Driven Development (BDD) fosters an environment where teams employ conversation and
specific examples to create a mutual understanding of the intended features of an application.
This approach aligns closely with the principles of Specification by Example and *Acceptance
Tests*, all of which can be implemented with this package.
BDD serves multiple purposes: It can be used as both acceptance tests and integration tests,
ensuring that the developed software meets the customer's requirements.
It provides explicit guidance for developers, detailing what needs to be done.
Similarly, it instructs testers on precisely what to test, and offers business stakeholders a
clear expectation of the end results.
A key aspect of BDD is writing test cases in a natural language that non-programmers and domain
experts can read.
The "Gherkin language" is not obligatory, but is frequently used for writing BDD test cases.
Gherkin is a domain-specific language that allows you to write your tests in a way that can be
easily read and understood.
A typical BDD written in Gherkin has the following structure:
1. Feature: A high-level business or product requirement
2. Scenario: A business rule that the system should fulfill
3. Given: The initial context at the beginning of the scenario
4. When: An event that occurs during the scenario
5. Then: The expected outcome
For instance:
`gherkin
Feature: User Authentication
Users should be able to log in and log out
Scenario: Successful Login
Given I am on the Login Screen.
When I enter a valid username and password.
Then I should be taken to the Home Screen.
Scenario: Failed Login
Given I am on the Login Screen.
When I enter an invalid username and password.
Then I should see an error message.
`
This format is highly readable, and business stakeholders will be able to understand
what's going on. This is a fundamental benefit of BDD, since it allows everyone involved to have a
clear understanding of the system's behavior and expectations.
It's very important the fact that BDDs are executable. In other words, they have some associated
TypeScript/JavaScript code that actually runs the test and marks them green
(passed ) or red (failed ).
Because of that:
- BDDs serve as a documentation for the system's behavior that's highly unlikely to become
outdated, unlike traditional documentation. This means the need for other documentation of your
software is greatly reduced.
- BDDs prevent regression, making sure the program is doing what's necessary, and will keep like
that in the future.
- BDDs allow for test-driven development (TDD), where you write the BDDs first, and then write
the code to make them pass (although it's not obligatory that you develop with TDD).
- BDDs help you refactor the code, as you can be sure that the system is still working as expected
after you make changes.
Writing good BDDs involves clear and concise communication. Test scenarios should be understandable,
unambiguous, and provide a clear distinction between the Given, When, and Then steps.
In addition, good BDDs should be independent, meaning they should not rely on the state from other
BDDs or require them to run in a specific order. They should also be written at a level of detail
that provides sufficient information without becoming overly complex.
Remember, the main idea of BDD is to clarify what should be done before you start coding.
This way, you ensure that you're building the right thing, and you can use your BDD
scenarios as a guide and validation tool throughout the development process.
---
4. Practical advice
The BDD tests should reflect what the system does, not how it's done. In special, you should
avoid specifying behavior through UI interactions. For example, the following is bad, as it talks about textfields and
buttons:
`gherkin
Given I am on the Login Screen.
When I click the first textfield and type a valid username and password,
And I click the blue login button.
Then The Home Screen swipes in from the right to the left of the screen.
`
UI changes all the time, and demands widget tests, which are harder to implement. Also, UI is

defined by the designer, not the business stakeholders or the developer. So, it's better to avoid UI

in BDDs.


The code itself should only use business classes, not widgets or other UI classes. This should be

easy to do as long as your code is properly structured, with clear separation between business and

UI code. If you're using a proper architectural pattern, you should be fine. If one day you are

implementing some BDD and you notice you need to touch the UI, that's a code smell, and means

you should refactor your code to separate code that shouldn't be there. Which means the BDDs will

also make sure your code is properly structured, one more advantage of using BDDs.


---


5. BDD Keywords


BDDs are divided into "sections" by the keywords Given, When and Then. Each section has
its own purpose:
- The Given section is for setting up the initial state of the system, and it's not
part of what's being tested. You can add expect calls in the Given section if you want,
but in this case they function like assertions, just to make sure the initial state is really
being respected. Surprisingly, the Given section is often the most complex part of the test,
as it's not always easy to put your system into a particular state. Pro tip: Creating helper classes
and standardized fixtures can help with that.
- The When section is what you are actually testing. It describes a specific action or event
that causes a change in the system's state.
- Lastly, the Then section outlines the expected result. It presents what you predict will
happen after the action specified in the When section has been performed. Here, you must include
one or more expect calls. These calls are there to verify that the action from the When
section has indeed caused the system's state to change as anticipated in the Then section.
These sections may optionally be broken into smaller phrases with the And keyword. For example:
`gherkin
Given user Alice has 10 shares of IBM and $20 in cash-balance.
`
May be written as:
`gherkin
Given user Alice has 10 shares of IBM,
And she has $20 in cash-balance.
`
You may also add tables to the sections, with any number of rows and columns, if you think it

improves readability. For example:
`gherkin
Feature: Buying and Selling Stocks
Scenario: Selling stocks.
Given The user has 120 dollars in cash-balance.
And The current stock prices are as such:
| Ticker | Price |
| AAPL | 50.25 |
| IBM | 30.0 |
| GOOG | 60.75 |
When ...
Then ...
`
Finally, you may want some of your BDDs to run more than once, each time with different data.

To that end you may add an
Examples section, with any number of rows and columns. For each
row, the BDD should run again, with the values from the row being passed to the code.
For example, this BDD should be run twice:
`gherkin
Feature: Buying and Selling Stocks
Scenario Outline: Buying and Selling stocks changes the average price.
Given The user has shares of at dollars each.
When The user of these stock at for each share.
Then The number of shares becomes plus/minus .
And The average price for the stock becomes .
Examples:
| Ticker | Quantity | At | BuyOrSell | How many | Price | Average Price |
| IBM | 10 | 100.0 | buy | 2 | 50.0 | 91.67 |
| IBM | 8 | 200.0 | sell | 3 | 30.0 | 302.0 |
`
---
6. Example App
I have published a GitHub repo that contains an
example
React Native mobile app
that I'm going to use to demonstrate how to write BDD tests.
You may clone and run the app in your own machine.
The app is a simple stock
portfolio app, where the user can buy and sell stocks:
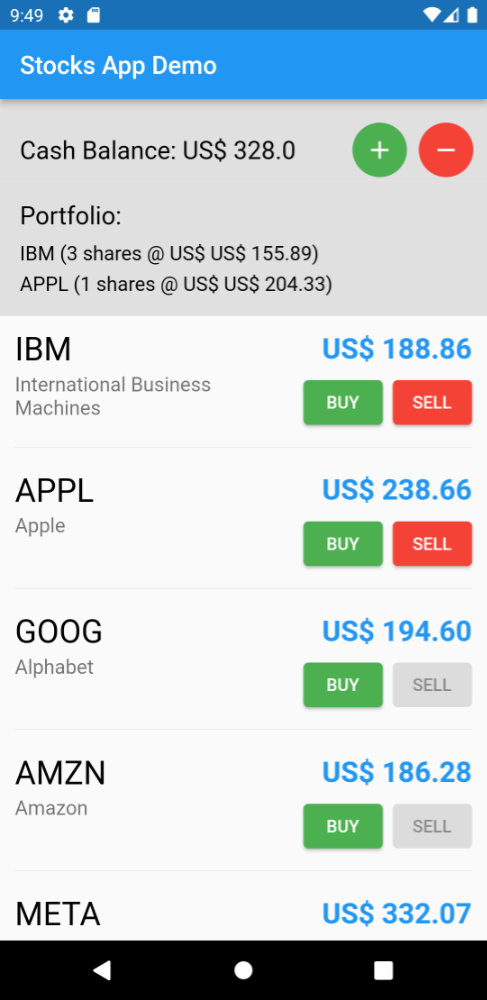
> As you can see in the screenshot above, the app has a list of available stocks, and a list of stocks
> the user owns, called the "Portfolio". The user can buy and sell stocks, and the app will update the
> Portfolio accordingly. The app also shows the user's Cash Balance, and the total value of the stocks
> the user owns. You can transfer money in and out of the app, US$ 100 at a time, by pressing the
> circle buttons at the top of the screen. When you have enough money to buy a particular stock, its
> buy button will be enabled.
> When you have enough stocks to sell, its sell button will be enabled.
> The stock prices continuously change, and the app will update the portfolio value accordingly.
> The Portfolio shows the average price of the stocks the user owns, and the total number of stocks
> the user owns.
The business classes are in
the
src/business directory, and the UI in
src/ui.
In practice, you will typically have many separate BDD files, one for each feature in the app.
However, for illustrative purposes, I have created just two BDD test files, located inside the
__tests__
directory of this GitHub repository:
*
bdd.AveragePrice.test.ts
*
bdd.BuyAndSell.test.ts
Note, I have prefixed the file names with bdd., but that's not necessary.
These BDD test files encompass a total of 3 BDDs, each illustrating different aspects of the current Easy BDD Tool.
It's worth noting that one of these files includes an Examples section with two rows, meaning it will execute twice,
each
time with different data.
However, these examples are not sufficient to ensure the entire app functions as intended. After reviewing the example
BDDs I've created, you may wish to experiment by crafting additional BDDs for the example app.
---
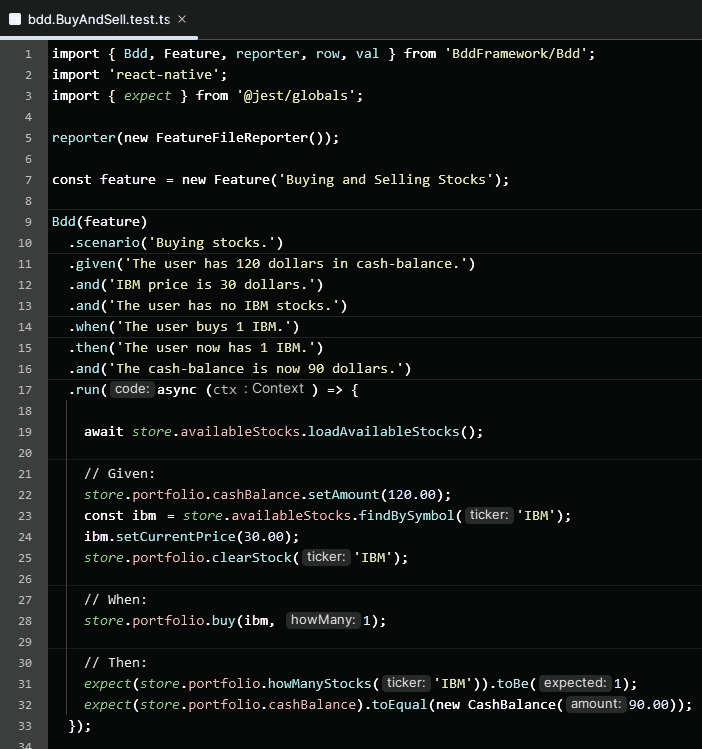
7. Hello World
Suppose you want to implement the following BDD:
`gherkin
Feature: Buying and Selling Stocks
Scenario: Buying stocks.
Given The user has 120 dollars in cash-balance.
And IBM price is 30 dollars.
And The user has no IBM stocks.
When The user buys 1 IBM.
Then The user now has 1 IBM.
And The cash-balance is now 90 dollars.
`
In

the

bdd.BuyAndSell.test.ts file you may translate that description into code, by writing the

following:
`typescript
const feature = new Feature('Buying and Selling Stocks');
Bdd(feature)
.scenario('Buying stocks.')
.given('The user has 120 dollars in cash-balance.')
.and('IBM price is 30 dollars.')
.and('The user has no IBM stocks.')
.when('The user buys 1 IBM.')
.then('The user now has 1 IBM.')
.and('The cash-balance is now 90 dollars.')
.run(async (ctx) => {
// Code here.
});
}
`
As you can see above, we first create a Feature object, and then a Bdd object, passing
that feature to it. Then we chain a bunch of given, when, then and and calls, and finally
call run to run the BDD. The run method takes a _callback_ that will be called when the BDD
starts running.
How to implement that callback is up to you, and depends completely on your business logic.
The callback may be sync or async, as needed.
To actually test what's being described in the BDD, use expect calls.
You should strive to make the test code very clean and easy to read and understand. That way, it will serve as
documentation for your app. Why? Because it demonstrates how to execute the feature described in the BDD. If you have
complete BDDs that cover the whole app functionality, this means you also now have complete isolated, simplified and
runnable code that demonstrates how to do everything that the app does. It's the perfect documentation!
The following is my code that actually runs the BDD test above.
`typescript
await store.availableStocks.loadAvailableStocks();
// Given:
store.portfolio.cashBalance.setAmount(120.00);
const ibm = store.availableStocks.findBySymbol('IBM');
ibm.setCurrentPrice(30.00);
store.portfolio.clearStock('IBM');
// When:
store.portfolio.buy(ibm, 1);
// Then:
expect(store.portfolio.howManyStocks('IBM')).toBe(1);
expect(store.portfolio.cashBalance).toEqual(new CashBalance(90.00));
`
As you can see above, I separated the code for the Given/When/Then sections with comments like
// Given: etc. That's optional, but recommended. The code is very readable and does exactly
what the BDD says it should do.
Note again that the test code callback itself has nothing to do with the Easy BDD Tool.
It's just plain TypeScript/JavaScript code that depends on your business logic. The complete code is this:
`typescript
Bdd(feature)
.scenario('Buying stocks.')
.given('The user has 120 dollars in cash-balance.')
.and('IBM price is 30 dollars.')
.and('The user has no IBM stocks.')
.when('The user buys 1 IBM.')
.then('The user now has 1 IBM.')
.and('The cash-balance is now 90 dollars.')
.run(async (ctx) => {
...
await store.availableStocks.loadAvailableStocks();
// Given:
store.portfolio.cashBalance.setAmount(120.00);
const ibm = store.availableStocks.findBySymbol('IBM');
ibm.setCurrentPrice(30.00);
store.portfolio.clearStock('IBM');
// When:
store.portfolio.buy(ibm, 1);
// Then:
expect(store.portfolio.howManyStocks('IBM')).toBe(1);
expect(store.portfolio.cashBalance).toEqual(new CashBalance(90.00));
});
`
When you run this BDD, you'll see the following output in the console:
`
TEST 1  ══════════════════════════════════════════════════


Feature: Buying and Selling Stocks


  Scenario: Buying stocks.


    Given The user has 120 dollars in cash-balance.

    And IBM price is 30 dollars.

    And The user has no IBM stocks.


    When The user buys 1 IBM.


    Then The user now has 1 IBM.

    And The cash-balance is now 90 dollars.
`
---
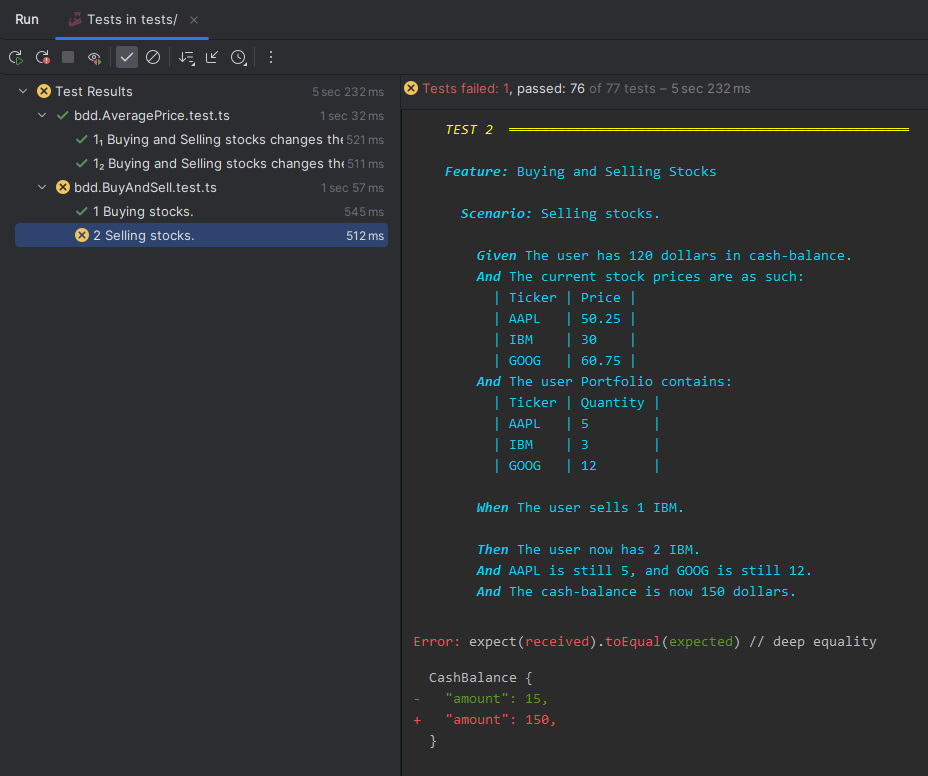
8. BDD Tables
The Gherkin language allows for tables in the BDD description. Tables let you present
information in a tabular manner, and are sometimes easier to read than plain text.
Suppose we have the following:
`gherkin
Feature: Buying and Selling Stocks
Scenario: Selling stocks.
Given The user has 120 dollars in cash-balance.
And Apple (AAPL) costs $50.25, IBM costs $30.0, and Google (GOOG) costs $60.75.
And The user Portfolio contains 5 AAPL, 3 IBM and 12 GOOG.
When The user sells 1 IBM.
Then The user now has 2 IBM.
And AAPL is still 5, and GOOG is still 12.
And The cash-balance is now 150 dollars.
`
To make the above BDD description easier to understand, we could have created two tables:
`gherkin
Feature: Buying and Selling Stocks
Scenario: Selling stocks.
Given The user has 120 dollars in cash-balance.
And The current stock prices are as such:
| Ticker | Price |
| AAPL | 50.25 |
| IBM | 30.0 |
| GOOG | 60.75 |
And The user Portfolio contains:
| Ticker | Quantity |
| AAPL | 5 |
| IBM | 3 |
| GOOG | 12 |
When The user sells 1 IBM.
Then The user now has 2 IBM.
And AAPL is still 5, and GOOG is still 12.
And The cash-balance is now 150 dollars.
`
These tables may be implemented in code by adding row objects into a .table method call.
Values are then added as val objects into the rows:
`typescript
Bdd(feature)
.scenario('Selling stocks.')
.given('The user has 120 dollars in cash-balance.')
.and('The current stock prices are as such:')
.table(
'Available Stocks',
row(val('Ticker', 'AAPL'), val('Price', 50.25)),
row(val('Ticker', 'IBM'), val('Price', 30.00)),
row(val('Ticker', 'GOOG'), val('Price', 60.75)),
)
.and('The user Portfolio contains:')
.table(
'Portfolio',
row(val('Ticker', 'AAPL'), val('Quantity', 5)),
row(val('Ticker', 'IBM'), val('Quantity', 3)),
row(val('Ticker', 'GOOG'), val('Quantity', 12)),
)
.when(...
.then(...
...
`
One way of implementing the above BDD is to hard-code the table values, as shown below:
`typescript
await store.availableStocks.loadAvailableStocks();
// Given:
store.portfolio.cashBalance.setAmount(120.00);
const aapl = store.availableStocks.findBySymbol('AAPL');
const ibm = store.availableStocks.findBySymbol('IBM');
const goog = store.availableStocks.findBySymbol('GOOG');
aapl.setCurrentPrice(50.25);
ibm.setCurrentPrice(30.00);
goog.setCurrentPrice(60.75);
store.portfolio.setStockInPortfolio('AAPL', 5, 100);
store.portfolio.setStockInPortfolio('IBM', 3, 100);
store.portfolio.setStockInPortfolio('GOOG', 12, 100);
// When:
store.portfolio.sell(ibm, 1);
// Then:
expect(store.portfolio.howManyStocks('IBM')).toBe(2);
expect(store.portfolio.howManyStocks('AAPL')).toBe(5);
expect(store.portfolio.howManyStocks('GOOG')).toBe(12);
expect(store.portfolio.cashBalance).toEqual(new CashBalance(150.00));
`
Another alternative is to read the values directly from the table. Notice the run method
gets a context object of type Context, usually named ctx:
`
.run(async (ctx) => { ...
`
You can get a table by its name, and from there get the rows and the values:
`
const table = ctx.table('Available Stocks');

const rows = table.rows;

const value = rows[0].val('Ticker');
`
The above BDD without hard-code values could then be written as shown below:
`typescript
await store.availableStocks.loadAvailableStocks();
// Given:
store.portfolio.cashBalance.setAmount(120.00);
// We read and create the info from the "Available Stocks" table:
const availableStocksTable = ctx.table('Available Stocks').rows;
for (const row of availableStocksTable) {
const ticker: string = row.val('Ticker');
const price: number = row.val('Price');
const stock = store.availableStocks.findBySymbol(ticker);
stock.setCurrentPrice(price);
}
// We read and create the info from the "Portfolio" table:
const portfolioTable = ctx.table('Portfolio').rows;
for (const row of portfolioTable) {
const ticker: string = row.val('Ticker');
const quantity: number = row.val('Quantity');
store.portfolio.setStockInPortfolio(ticker, quantity, 100);
}
// When:
const ibm = store.availableStocks.findBySymbol('IBM');
store.portfolio.sell(ibm, 1);
// Then:
expect(store.portfolio.howManyStocks('IBM')).toBe(2);
expect(store.portfolio.howManyStocks('AAPL')).toBe(5);
expect(store.portfolio.howManyStocks('GOOG')).toBe(12);
expect(store.portfolio.cashBalance).toEqual(new CashBalance(150.00));
`
This code is more complex. It's probably better to hard-code the values, unless in case of large

tables. Use good judgement.


---


9. BDD Examples


Besides tables, the Gherkin language also allows for examples in the BDD description.


While tables are optionally used only to make to BDD description easier to understand, examples are

something else entirely. They are used to generate multiple BDDs from a single BDD description.


If you add more than one
.example to a BDD description, the BDD will be run once for each one.
These runs are independent, which means some of them may pass and others may fail.
Consider the following BDD description:
`gherkin
Feature: Buying and Selling Stocks
Scenario Outline: Buying and Selling stocks changes the average price.
Given The user has shares of at dollars each.
When The user of these stock at for each share.
Then The number of shares is becomes plus/minus .
And The average price for the stock becomes .
Examples:
| Ticker | Quantity | At | BuyOrSell | How many | Price | Average Price |
| IBM | 10 | 100.0 | buy | 2 | 50.0 | 91.67 |
| IBM | 8 | 200.0 | sell | 3 | 30.0 | 302.0 |
`
The examples may be implemented in code by adding val objects into .example method calls:
`
Bdd(feature)

  .scenario( ...

  .given( ...

  .when( ...

  .then( ...

  .and( ...

  .example(

    val('Quantity', 10),

    val('At', 100.00),

    val('BuyOrSell', BuyOrSell.BUY),

    val('How many', 2),

    val('Price', 50.00),

    val('Average Price', 91.67),

  )

  .example(

    val('Quantity', 8),

    val('At', 200.00),

    val('BuyOrSell', BuyOrSell.SELL),

    val('How many', 3),

    val('Price', 30.00),

    val('Average Price', 302.00),

  )

  .run((ctx) async { ...
`
Note the example values are not limited to strings. They can be of any type, including enums, numbers,

custom classes, etc.


The code that implements the BDD test must read those typed values from the
Examples section,
using the ctx.example object:
`typescript
const quantity: number = ctx.example.val('Quantity');
const atPrice: number = ctx.example.val('At');
const buyOrSell: BuyOrSell = ctx.example.val('BuyOrSell');
const howMany: number = ctx.example.val('How many');
const price: number = ctx.example.val('Price');
const averagePrice: number = ctx.example.val('Average Price');
`
You can also write it like this, if you want:
`typescript
const val = ctx.example.val;
const quantity: number = val('Quantity');
const atPrice: number = val('At');
const buyOrSell: BuyOrSell = val('BuyOrSell');
const howMany: number = val('How many');
const price: number = val('Price');
const averagePrice: number = val('Average Price');
`
As you can see, the values are read by _name_, and the type is inferred from the variable type.


Notice you don't need to refer to the number of the example you are reading, because the Easy BDD Tool will

automatically run the BDD as many times as needed, one for each set of example values.

In this example it will be run twice.


Here is the complete code:
`typescript
Bdd(feature)
.scenario('Buying and Selling stocks changes the average price.')
.given('IBM is an available stock.')
.and('The user has [Quantity] shares of IBM at [At] dollars each.')
.when('The user [BuyOrSell] [How many] of these stocks at [Price] for each share.')
.then('The number of shares becomes [Quantity] plus/minus [How many].')
.and('The average price for the stock becomes [Average Price].')
.example(
val('Quantity', 10),
val('At', 100.00),
val('BuyOrSell', BuyOrSell.BUY),
val('How many', 2),
val('Price', 50.00),
val('Average Price', 91.67),
)
.example(
val('Quantity', 8),
val('At', 200.00),
val('BuyOrSell', BuyOrSell.SELL),
val('How many', 3),
val('Price', 30.00),
val('Average Price', 302.00),
)
.run(async (ctx) => {
...
// Read example values.
const quantity: number = ctx.example.val('Quantity');
const atPrice: number = ctx.example.val('At');
const buyOrSell: BuyOrSell = ctx.example.val('BuyOrSell');
const howMany: number = ctx.example.val('How many');
const price: number = ctx.example.val('Price');
const averagePrice: number = ctx.example.val('Average Price');
// Sets up everything and just make sure we have money to buy whatever we need.
store.portfolio.cashBalance.setAmount(100000.00);
// Given:
await store.availableStocks.loadAvailableStocks();
expect(store.availableStocks.findBySymbolOrNull('IBM')).not.toBeNull();
const availableStock = store.availableStocks.findBySymbol('IBM');
availableStock.setCurrentPrice(atPrice);
store.portfolio.setStockInPortfolio('IBM', quantity, atPrice);
// When:
availableStock.setCurrentPrice(price);
store.portfolio.buyOrSell(buyOrSell, availableStock, howMany);
// Then:
expect(store.portfolio.howManyStocks('IBM')).toBe(quantity + (buyOrSell.isBuy ? howMany : -howMany));
expect(store.portfolio.getStock('IBM').averagePrice).toBe(averagePrice);
});
`
Final notes


$3


Bdd tests use Jest under the hood, so you can use all the features of Jest in your BDD tests,

like
beforeEach and afterEach.
You can even mix BDD tests with regular Jest tests in the same file, even though that's not very common:
`typescript
beforeEach(async () => {
calculator.clear();
});
const feature = new Feature('Calculator');
Bdd(feature)
.scenario('Adding numbers')
.given('The numbers 1 and 2.')
.when('The numbers are added.')
.then('The result is 3.')
.run((ctx) => {
expect(calculator.press(1).press('+').press(2).press('=')).toBe(3);
});
it('multiplies numbers', (): void => {
expect(calculator.press(2).press('*').press(3).press('=')).toBe(6);
});
`
$3


To run the BDD tests, you can use the command line, similar to how you would run typical Jest tests.

Or you can use your IDE's built-in test runner. In IntelliJ, for example, you can create a "Run Configuration"

to execute tests.


Additionally, in most IDEs, you can execute standard Jest test files by clicking the play button
⏵`
shown in the file editor.
In the future I'll publish plugins for IntelliJ and Visual Code, enabling this play button to appear beside each BDD
test name and on the file itself. Currently, the play button is visible only for files that include standard Jest tests,
and also when you right-click on folders containing these standard tests.
---
_Marcelo Glasberg_
_glasberg.dev_
_github.com/marcglasberg_
_linkedin.com/in/marcglasberg/_
_twitter.com/glasbergmarcelo_
_stackoverflow.com/users/3411681/marcg_
_medium.com/@marcglasberg_
More of my open source code:
* _In Github_
* _Same App, Different Tech project_
* _Flutter/Dart code_
* _IntelliJ Plugins_
My Articles:
*
Async Redux: Flutter’s non-boilerplate version of Redux
(versions:
Português)
*
i18n_extension
(versions:
Português)
*
Flutter: The Advanced Layout Rule Even Beginners Must Know
(versions: русский)
*
The New Way to create Themes in your Flutter App
* Understanding constraints (in the official
Flutter documentation)