sunpeak
v0.13.6TypeScript
The ChatGPT App framework. Quickstart, build, & test your ChatGPT App locally!
openai-apps-sdk-uiopenai-appchatgpt-apps-sdkchatgpt-appmcp-uimcpchatgpt-simulatortestingmulti-platformreact
1.5K/weekUpdated todayMITUnpacked: 66.5 MB
Published by Sunpeak AI
npm install sunpeak
sunpeak


Local-first MCP Apps framework.
Quickstart, build, test, and ship your Claude or ChatGPT App!
Demo (Hosted) ~
Demo (Video) ~
Discord (NEW) ~
Documentation ~
GitHub ~
Resource Repository
Quickstart
Requirements: Node (20+), pnpm (10+)
``bash`
pnpm add -g sunpeak
sunpeak new
To add sunpeak to an existing project, refer to the documentation.
Overview
sunpeak is an npm package that helps you build MCP Apps (interactive UI resources) while keeping your MCP server client-agnostic. Built on the MCP Apps SDK (@modelcontextprotocol/ext-apps). sunpeak consists of:
$3
1. Runtime APIs: Strongly typed React hooks for interacting with the host runtime (useApp, useToolData, useAppState, useHostContext), architected to support generic and platforms-specific features (ChatGPT, Claude, etc.).
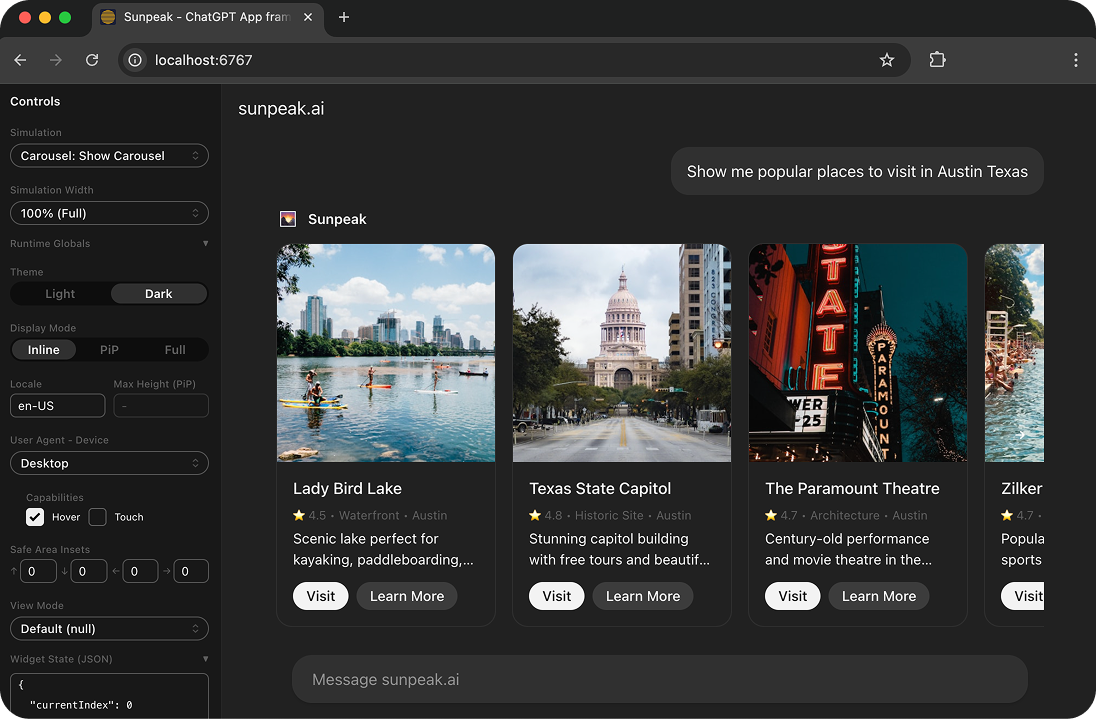
2. ChatGPT simulator: React component replicating ChatGPT's runtime to test Apps locally and automatically via UI, props, or URL parameters.
3. MCP server: Serve Resources with mock data to the real ChatGPT with HMR (no more cache issues or 5-click manual refreshes).
$3
Next.js for MCP Apps. Using an example App my-app with a Review UI (MCP resource), sunpeak projects look like:
`bash`
my-app/
├── src/resources/
│ └── review/
│ └── review-resource.tsx # Review UI component + resource metadata.
├── tests/simulations/
│ └── review/
│ ├── review-{scenario1}-simulation.json # Mock state for testing.
│ └── review-{scenario2}-simulation.json # Mock state for testing.
└── package.json
1. Project scaffold: Complete development setup with the sunpeak library.apps-sdk-ui
2. UI components: Production-ready components following ChatGPT design guidelines and using OpenAI React components.-resource.tsx
3. Convention over configuration:
1. Create a UI by creating a file that exports a ResourceConfig and a React component (example below).Simulation
2. Create test state (s) for local dev, ChatGPT dev, automated testing, and demos by creating a -simulation.json file. (example below)
$3
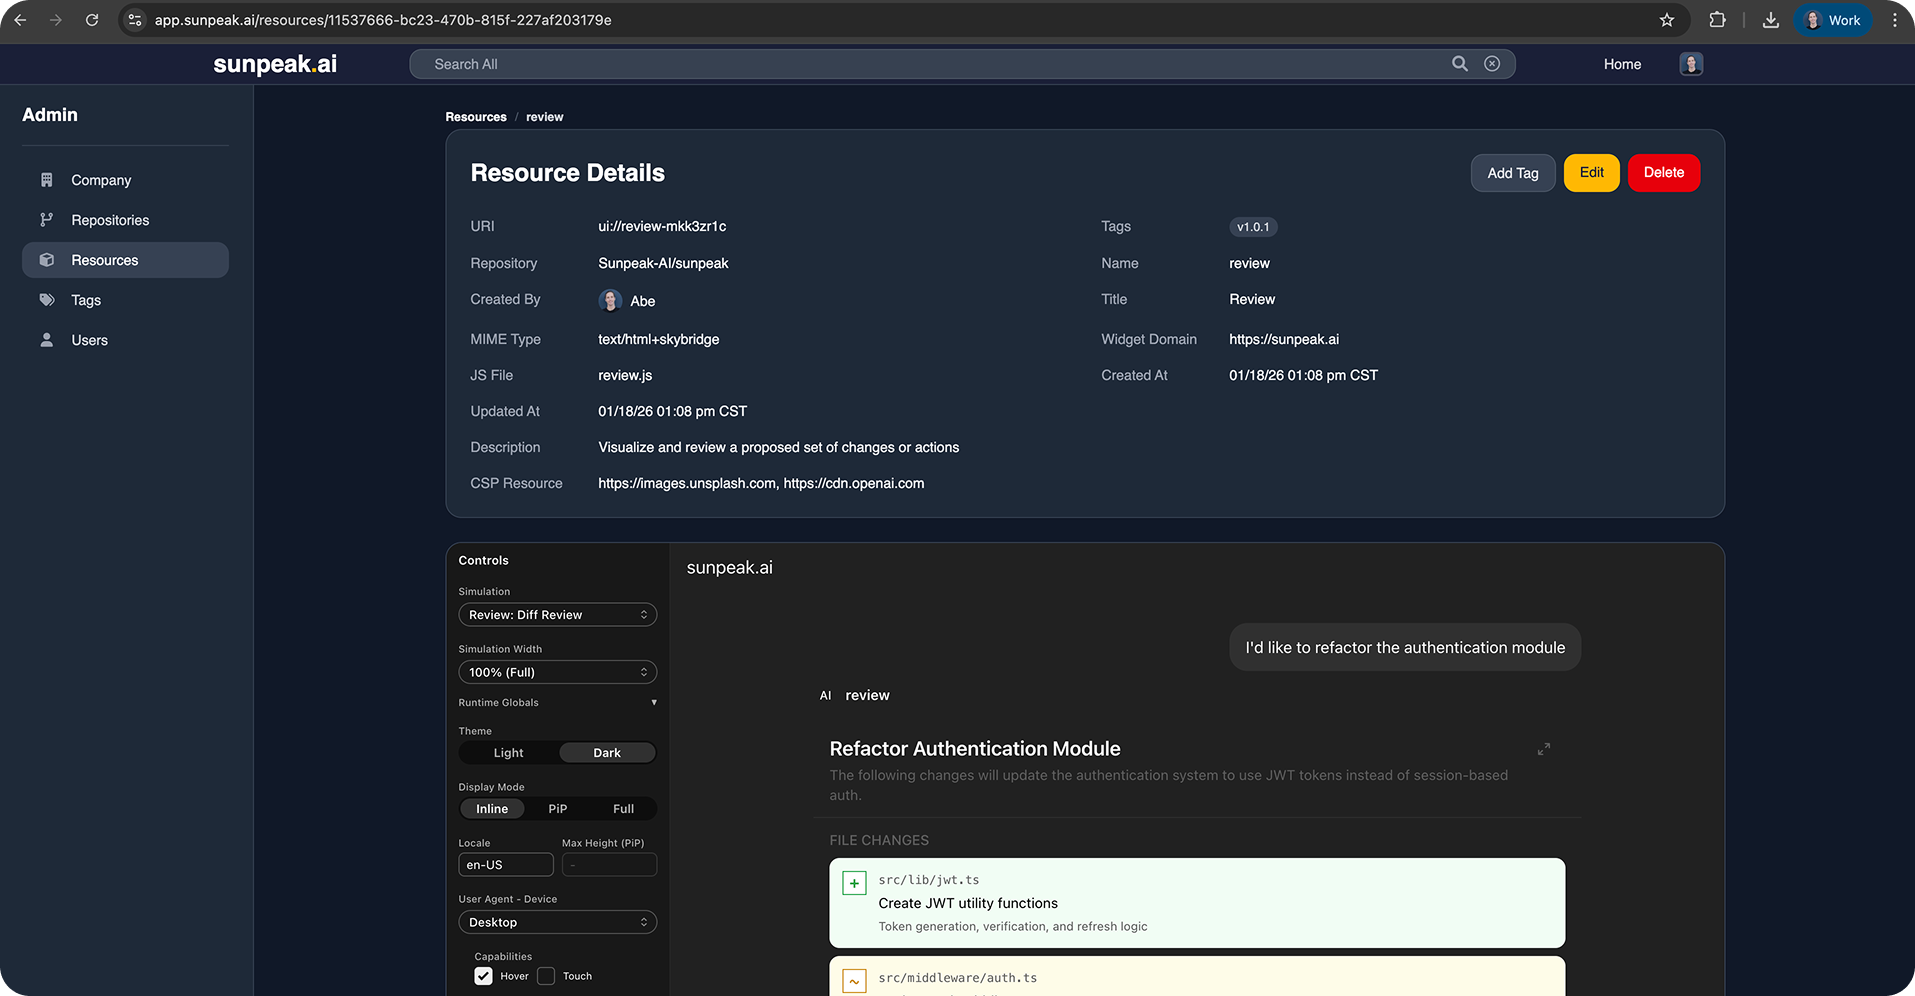
Commands for managing MCP Apps. Includes a client for the sunpeak Resource Repository. The repository helps you & your CI/CD decouple your App from your client-agnostic MCP server while also providing a hosted runtime to collaborate, demo, and share your MCP Apps.
Think Docker Hub for MCP Apps:
1. Tag your app builds with version numbers and environment names (like v1.0.0 and prod)sunpeak push
2. built Apps to a central locationsunpeak pull
3. built Apps to be run in different environments, like your production MCP server.
4. Share your fully-functional demo Apps with teammates, prospects, and strangers!
Example App
Example Resource, Simulation, and testing file (using ChatGPTSimulator) for an MCP resource called "Review".
$3
`bash`
my-app/
├── src/resources/
│ └── review/
│ └── review-resource.tsx # This!
Each resource .tsx file exports both the React component and the MCP resource metadata:
`tsx
// src/resources/review/review-resource.tsx
import { useToolData } from 'sunpeak';
import type { ResourceConfig } from 'sunpeak';
export const resource: ResourceConfig = {
name: 'review',
description: 'Visualize and review a code change',
_meta: { ui: { csp: { resourceDomains: ['https://cdn.openai.com'] } } },
};
export function ReviewResource() {
const { output: data } = useToolData
return
Review: {data?.title}
;}
`
$3
bash
├── tests/simulations/
│   └── review/
│       ├── review-{scenario1}-simulation.json  # These!
│       └── review-{scenario2}-simulation.json  # These!
` testing object (.json) defining key App-owned states.Testing an MCP App requires setting a lot of state: state in your backend, MCP tools, and the host runtime.
Simulation files contain an official MCP tool object, toolInput (the arguments sent to CallTool), and toolResult (the CallToolResult response) so you can define backend, tool, and runtime states for testing.`jsonc
// tests/simulations/review-diff-simulation.json{
// Official MCP tool object.
"tool": {
"name": "review-diff",
"description": "Show a review dialog for a proposed code diff",
"inputSchema": { "type": "object", "properties": {}, "additionalProperties": false },
"title": "Diff Review",
"annotations": { "readOnlyHint": false },
"_meta": {
"ui": { "visibility": ["model", "app"] },
},
},
// Tool input arguments (sent to CallTool).
"toolInput": {
"changesetId": "cs_789",
"title": "Refactor Authentication Module",
},
// Tool result data (CallToolResult response).
"toolResult": {
"structuredContent": {
"title": "Refactor Authentication Module",
// ...
},
},
}
`$3
bash
├── tests/e2e/
│   └── review.spec.ts # This! (not pictured above for simplicity)
└── package.json
`The
allows you to set host state (like light/dark mode) via URL params, which can be rendered alongside your Simulations and tested via pre-configured Playwright end-to-end tests (.spec.ts).Using the
ChatGPTSimulator and Simulations, you can test all possible App states locally and automatically!`ts
// tests/e2e/review.spec.tsimport { test, expect } from '@playwright/test';
import { createSimulatorUrl } from 'sunpeak/chatgpt';
test.describe('Review Resource', () => {
test.describe('Light Mode', () => {
test('should render review title with correct styles', async ({ page }) => {
const params = { simulation: 'review-diff', theme: 'light' }; // Set sim & host state.
await page.goto(createSimulatorUrl(params));
// Resource content renders inside an iframe
const iframe = page.frameLocator('iframe');
const title = iframe.locator('h1:has-text("Refactor Authentication Module")');
await expect(title).toBeVisible();
const color = await title.evaluate((el) => window.getComputedStyle(el).color);
// Light mode should render dark text.
expect(color).toBe('rgb(13, 13, 13)');
});
});
});
``Resources
- MCP Apps
- ChatGPT Apps SDK Design Guidelines
- ChatGPT Apps SDK Documentation - UI
- ChatGPT Apps SDK UI Documentation